The Mixed Media viewer is displayed when 1-up perfect
binding is selected for the booklet type.
Not all printers support 1-up perfect
binding. If 1-up perfect binding is not supported, the option is not displayed in the
Booklet Type menu.
- Select your job in Command WorkStation
Job Center and open Job
Properties.
- Select Booklet in the Layout tab.
- Choose 1-up
Perfect for the Booklet Type.
- Choose the binding edge.
- Specify the Body Paper
Size and Cover Paper Size.
Note: Define
Cover is not available as a Mixed Media choice in Booklet Maker. Cover definitions are created using the standard Booklet Maker options.
- Specify cover settings and any other settings as required.
- Scroll down to the Mixed
Media viewer and specify settings using the following controls:
Pages tab - Click to display layout of booklet organized by document pages of document
and to show relationship to sheets.
Sheets tab - Click to display layout of booklet organized by sheets and to show
relationship to pages.
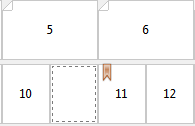
Chapter Start Page(s)
field - Type page numbers that you designate as chapter
starts, with commas in between. Chapter start pages are designated
in viewer by a marker. Implicit blanks are inserted as needed. The
graphic below shows the chapter start marker and the implicit blank
inserted after page 10.

New Page Range -
Click icon or button to type page numbers and then apply media settings
to specified page range.

New Insert -
Click the icon or button to insert a blank page at specific location
and apply media settings to insert.

Edit - Click the icon or button to modify page range or new insert media settings.

Delete - Click the icon or button to delete page range or new insert settings.

For information about the media settings that apply for your Fiery server, see Printing and Utilities in the user
documentation set.


